July 31, 2016

The nejiri and the stopper

And now for something completely different! I haven't used the Pattern Magic books in a while, have I? 
Well, I decided it was that time again. This time, I was going for something fairly simple: the nejiri or twist. A design which appears both in Pattern Magic 1 and in Pattern Magic - Stretch Fabrics, all be it with some differences.

I made a nejiri top based on the instructions in the first book way back in 2011. I didn't even blog about it but I did put it on Burdastyle. This is the picture I showed there. I don't have it anymore. The fabric got a bit worn out and I remember finding it annoying that I had to keep adjusting to the top to keep that twist in place. This is something which is hinted at in the book. And in the third book, there is a version of this top in which the issue is addressed: The twisted top with stopper.

This one. 
There are some differences in the drafting instructions (like the amount of horizontal shift and whether or not the armholes get shifted too) but the twist principle is basically exactly the same. The top itself is not quite the same. In the older instructions, the twist is added to a basic sloper (without waist darts, but still), in the newer book, the top itself has straight sides and would, without the twist be loose-fitting. 
I decided to try out the new version as described.

This also gave me a good opportunity to investigate something I have wondered about for a long time: Are the shifts on the front and back pattern pieces the same or mirrored? 
When I made my original top, I followed the instructions given in the book to cut the whole top as one big pattern piece. This meant both front and back curved in the same direction. Later, I saw a blog post by someone else who had made this top but seemed to have mirrored the pieces. 
Now, it was time to try out. Luckily, I had enough fabric to cut three body pieces and those stoppers (which are just bands of fabric). 

These are the pictures of the top with the same pattern piece used for front and back (my apologies for the lighting issues in all the following pictures. I was in a bit of a hurry and didn't check them properly).


The twist looks pretty much like that in the picture in the book (especially if you keep in mind that the "stopper" at the bottom will help to keep that waist twist in shape).
Laid flat, it looks like this:

Do you see the way the seam curves to the front?


And this is the result with a mirrored piece for the back. I somehow thought it might provide more relaxed twisting but I think it may be a bit too relaxed...


It was really hard to get the top on the dummy in such a way that the armholes were more or less at the same level while there is no real twisting at the waist.
Flat on the table, this one looks quite interesting:


This shape might work better in a more fitted garment but I think my test here proves I did understand the instructions all along. The nejiri top can be a bit fussy to wear, but I did make it the way the book intended and I will do that again.
Now, I just have to put on those stoppers!

July 24, 2016

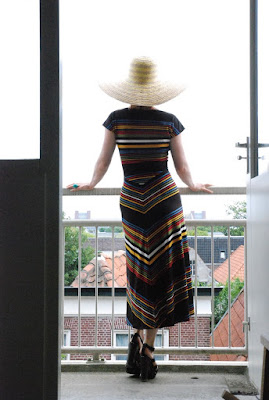
Summer stripes!

Most of what can be said about this dress has already been said. In that first post, in which I discussed the design options and whether or not they were suitable for this particular fabric. And in the second one, in which I complained about the fabric.
All I can tell you is that the sewing didn't present any problems and made me feel a lot better about the dress.
This particular jersey is stable enough to be easy to handle. The order of construction was simple enough to plan and to execute (I usually plan how to 
sew something from the moment I start making the pattern).

All I really have to do now is show it off...


Some guesswork went into making this pattern. Educated guesses, based on the way an older dress fits now. And it really worked out! 


I am also really pleased with the way the skirt falls. It has only one seam, at center back. This means the front is on the straight grain and the sides and back curve to the bias (of course, as I mentioned before, grain doesn't quite work like that in a knit but it also kind of does and it makes for an easy term to discuss fabric behaviour). As a result, it falls down in a sleek shape at the front and has some flare at the back. Quite flattering, if I say so myself. 


All's well that ends well. I'm happy with this dress and in the end it became just the kind of pick-me-up project I needed. 

July 20, 2016

Progress... of a sort

So, I have made the pattern for that striped dress. I agreed with those of you who commented on my previous post and went with sketch number one. 

Making the pattern, based on my knit sloper, was really easy. The difficulty with this dress was always going to be found in cutting and sewing those stripes to match. 
And when I started on that cutting, I made an unwelcome discovery: No matter how much I tried, I couldn't manage to fold the fabric in such a way that the stripes matched. It even seemed like the same stripes weren't even similar in width across the entire width of the fabric...
Obviously, I gave up on folding the fabric. I decided to go with a single layer lay-out. Then, I realized that one of the selvedges was putting tension on the fabric. So, I cut it off. And then, I realized that there was yet another issue. An issue which is not uncommon for jersey fabrics but I had hoped this one wouldn't suffer from it: The selvedge was not at a square angle to the stripes at all. 
This is common because a lot of jersey is knitted in the round (which is much quicker and therefore cheaper than knitting flat). This means that there are no separate rows of knitting, just an almost endless spiral, which, in turn, makes all the stitches slightly slanted in the direction of the knitting process. Sometimes the resulting big tubes of fabric are sold like that but more often they are slit open and the cut edges are finished with something that kind of feels like glue.  That cutting isn't necessarily done with great care. The round knit fabric didn't really have a perfect straight grain (which is actually an incorrect term when it comes to knitted material) to start with and the rough cutting means you can be in serious trouble with fabric like that.
In this case, the selvedges didn't look like they had been cut. So, I thought it would be fine... No such luck. 
After messing with it yesterday, I decided to preserve my sanity and double the pattern pieces. So, today I had another go at it.

Much better!

This simple thing caused so much fuss that I almost felt like giving up on it. Now I'm glad I didn't. I just machine basted all the seams where the stripes have to match. Like most of the time, all is well as soon as I start sewing.

July 17, 2016

Simple stripe-y summer dress

Although I love all kinds of complicated well-constructed dresses, vintage style and otherwise, there is another style I can't really do without: The simple jersey dress. I've made several different versions over the years but I think it is time for some more. 
The first fabric I want to use for one of those is this dark brown jersey with stripes in different colours. I think it may be a blend of viscose and cotton and the fabric is nice and solid and has good recovery. So, no weird issues I have to compensate for. 

I have about 3 meters of this stuff and I wouldn't mind having enough left for a top. Because the scale of the stripes is fairly large, I think it would look best if I used it in large, fairly uninterrupted pieces. And I think I should pay close attention to which part of the stripe pattern I place where.
I have been thinking about it for a while and there are some features I know I want, and some I am still considering.
The one unusual detail I want in this dress has to do with the skirt: Obviously, I like to match obvious stripes like this but I am considering a long dress and long, straight skirts (the only ones which can be matched nicely at the side seams) don't really work for me. So, I think I will cut the front of the dress as one piece and attach the back skirt to it, following the waist-to-hip angle. I hope the fabric is wide enough.

For the top, I am considering different options. Cut-on cap sleeves, normal set-in ones or raglan. Plain back, back yoke and/or some kind of cut-out. Straight waist seam at the back or one which follows the stripes. 
The options are in the sketches but could also be mixed and matched. 


I actually love the idea of a back cut-out but every option which has one also leads to more piecing at the back. If my fabric had simple even stripes in just two colours, I think I could make that work really well. But this is a colourful, busy kind of striped fabric and that makes me think I should keep things simple. With that in mind, I am drawn towards the first sketch. I'm still not sure about the sleeve choice though. The cap sleeve is nice but I also like the t-shirt effect you get with the set-in sleeve...
What do you think?  

July 13, 2016

En Vogue

Are you enjoying summer weather yet? (if you are in the northern hemisphere, of course) Do you have to try and keep every-day-life going in the heat or are you longing for sunshine? 
Here in the Netherlands, the weather is still only a bit summer-y and, on some days, we get quite a bit of rain. I'm not great with hot weather so I don't really mind. But I did think it was time to share some seasonal vintage goodness.

So today, I have this for you: 


French Elle from 14 July 1955 (it was a weekly magazine back then, can you imagine? Thinner than it is today but still a fairly thick magazine. And I'm surprised the magazine was published on "Quatorze Juliet". Surely printers, postmen and magazine sellers didn't have to work on the national holiday...). 

I'll mostly stick to showing you the fashion pages but I thought you might like these ads:


Playtex lingerie and a glamorous lady in a beautiful bathing suit to sell suncream.

Despite the cover which suggests sun-soaked beach holidays at the beach, the contents of the magazine are rather more normal.


There are two spreads on the practical combination of dress and jacket to get a lady properly dressed through the whole day. Some of these are really nice but to me, those jackets just look very warm for France in July.


This feature, about the influence of science on fashion (in the development of new textile fibers) is very common throughout the 1950's. Usually, they are singing the praises of things like nylon dresses... 


And we get the low-down on 1955's hit-dress-shape: the drop-waist. This style is pretty elegant and actually even better at showing off a tiny waist than the more common shape with the seam at the waistline. I always wonder about the practicality though: To make it look good, the bodice has to fit closely but how does that hold up to normal wear? 

The answer is given here, at the corner, bottom right.


I've enlarged that bit for you. This is how you wear a dress like this: closely fitted over the right kind of lingerie corset. Of course, that would work. This way, the lingerie will take the strain of your body's movements and the dress just sits on top of that. Of course it would be a bit confining for the wearer (although many ladies in 1955 were probably quite used to wearing this kind of thing). And warm.

Then, we get the sewing projects! Back in the day, Vogue offered designs for which readers could order the patterns.


In this case, there are two mix-and-match sets of four pieces each. I like the first one best because it offers the greatest variety in shapes. And who doesn't love a good stripe? 
Oh, and these pictures are blurry because of anything I did. The colour printing in these old magazines is often less than great and this particular spread really suffered from that. 

And then, finally, there is a page dedicated to holiday wear. We're still not getting anything for the beach though.


Lovely dresses for work in the garden (top left), vacation in the countryside (bottom left) and in town (right). But you could order the sewing patterns for these too!

Oh, and if you noticed the line on the cover about a "new Barbar". Here is it:


July 8, 2016

Sewing and climbing

Here's a promise: This will be the last post about rock climbing for a little while. In the coming weeks, I plan some normal sewing related blog posts. I'm thinking about some vintage magazine stuff, some modern sewing, some vintage and maybe I can even come up with a nice tutorial... 
But in this blog post, I would like to share some of the pictures from last weekend. 

Last weekend, E and I went to the Belgian Ardennes (if you live in the Netherlands, those are the mountains closest to home) with a group of people from our local department of the Dutch climbing and mountaineering club to practice our outdoor climbing skills. (because there are no mountains in the Netherlands, the vast majority of Dutch climbers starts out on the plastic of the climbing gym and only makes the transition to real rock later. The club facilitates that learning curve by training instructors who help gym-climbers to get their first taste of the great vertical outdoors in a safe way. The third person in some of these pictures is our instructor, a different one each day).
Of course, that in itself doesn't really qualify for page-time here, on my sewing blog (I don't have other blogs but you know what I mean). I feel I can show off my climbing pictures here because I only wore me-made clothes on that climbing trip.   


To be precise, I wore these jeans and this jacket (and sports tops I made too, but those can't be seen in the pictures). And (also not pictured) in the evening at the campsite I layered my old, fairly worn, green tweed double breasted jacket on top.

Both jeans and jacket were sort of experimental in pattern and design. 
The jacket was made as sportswear and does excellent duty as such. I had some doubts about the fabric when I first finished it but in every-day use it is fine. It may feel a bit synthetic when you first put it on but that impression doesn't last. Not even when I wore it when warming up in the climbing gym in late winter. And neither in the not-quite-warm-enough vaguely summer-y weather we had at the Belgian crags. 
The fitted shape makes it sit well under my climbing harness. The slightly (over)long sleeves and bottom edge mean creeping up doesn't become an issue and it has zippered pockets in such a position that the contents would only get crushed on very acrobatic moves (and I'm still a newbie on real rock so I don't really go in for those yet)

The trousers were originally meant to take a place in my normal wardrobe. They were to be my cool-girl-trousers. I had come up with this odd slightly baggy fit with a bit of added room at the crotch and upper legs. 
They are very, very comfortable and I sort of liked them but I never quite succeeded at matching them well with any tops in my wardrobe (the outfit with the jacket, in the original blog post, was by far the best look I ever found for these). They did see plenty of wear for hiking and for all kinds of activities where functionality and comfort are rated higher than style. 
So, it was only logical that I would take them rock climbing (I actually own one pair of RTW outdoor trousers but I don't like the fit of those. The waistline sits at a level that just feels uncomfortable). I could move really well in them and the fabric (fairly thick denim, softened by an early treatment with fabric softener and subsequent wear and laundry) proved sturdy enough to withstand two days of brushing against rough limestone. 

Of course, clothes made from such every-day-fabrics as these won't work well if I ever get into serious alpine climbing but for outings like this one, they're absolutely fine. In fact, I am thinking about making one more of each before my summer holiday...


July 6, 2016

One sports bag...

It's finished! That bag I told you about. Unfortunately, I didn't get it done in time to take it on our climbing trip last weekend (more about that in the next post) but after today, it can take our harnesses, shoes and other gear to the climbing gym and on future trips to real rock. 

These are just some quick pictures to show you the bag. I stuffed it with a pillow and put it on the living room floor to get the shots. I will post a proper in-action picture later so you can get a better idea about the scale of the thing.

It is actually fairly small for this type of bag because I was restricted by the amount of material I had. This last weekend, I saw the type of bag this one was inspired by in use by other climbers. That did help me get a better idea about the use of its various features. It was too late to change anything about this one but I will keep that in mind for a next version. 


In addition to the features I have shown you before (like that U-shaped zipper!). My bag has short handles next to the zipper and at one end. It is all made from the same black fabric/plastic with 5 cm wide black straps and 2.5 cm wide red straps. 

I attached the shoulder strap with D-rings and it has one slide adjuster. And I even made one of those pad-things for carrying comfort. 

When all of that was finished, I didn't like the sadly collapsed look of it and decided to give the edges a bit of body. I did that by hand-stitching some old phone wire to the seam allowances (old and no longer useable. I kept this stuff for a couple of years thinking it might one day be useful for a sewing project...). Of course, the best way of including something like this would have been to encase it in a strip of fabric and sew that into those seams so it would be on the outside, like bulky piping. Live and learn...